In this blog, we are going to setup Azure AD as a 3rd Party IdP to provide seamless authentication into the Workspace ONE Access Digital Workspace. This blog assumes that you are using native Azure AD authentication or using a federated domain that is NOT Workspace ONE Access.
Lets start by logging into our downloading our Workspace ONE Access Metadata
Workspace ONE Access SP Metadata
- Log into your Workspace ONE Access Administration Console
- Click on Catalog -> Web Apps
- Click on Settings
- Click on SAML Metadata

- Download your Service Provider (SP) metadata file
Azure AD Configuration
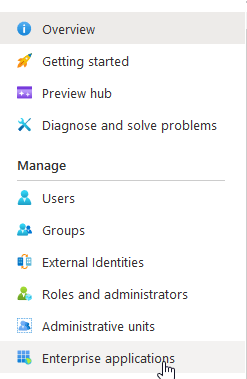
- In your Azure AD Console, click on Enterprise Applications
- Click on “New Application”
- Click “Create your own application”
- Provide a name for this application. ie. Workspace ONE Access
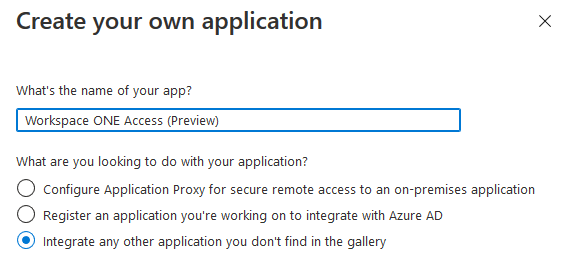
- Click Create
- Click on Single-sign-on
- Select SAML

- Click on “Upload metadata file” on the top bar

- Select the file you downloaded earlier and click Add
- You will not need to modify anything at this point. Click Save

- Close the SAML Configuration Window. If prompted to test the SAML, select you’ll test later.
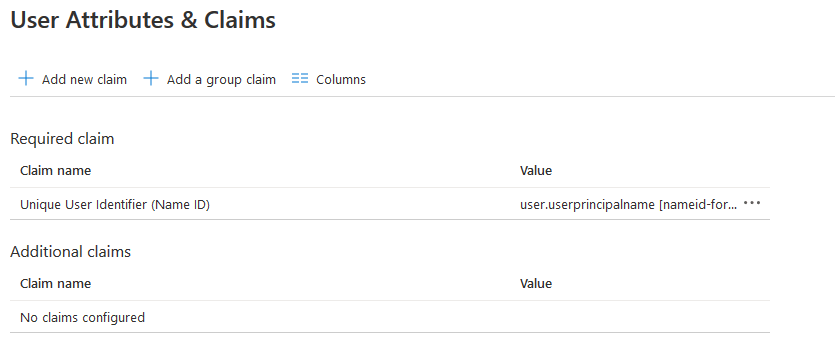
- Under “User Attributes & Claims”, click Edit
- In this scenario, we are going to assume users are being synchronized by a connector. If you are configuring JIT provisioning of users into Workspace ONE Access, see the section on JIT.
- Delete all the additional claims
- We will leave the User Principal Name as the NameID and close this configuration
- Under SAML Signing Certificate, click Add a Certificate
- Select New Certificate (or Import if you have a 3rd party certificate)
- Click Save and Close the Certificate Window when complete
- Download your Metadata

- Click on Users and Groups
- Assign the appropriate users to the application

Creating Azure AD as a 3rd Party IDP in Workspace ONE Access
- Log into the Workspace ONE Administration Console
- Click on Identity & Access Management -> Identity Providers
- Click Add Identity Provider -> Create SAML IDP

- Provide a name ie. Azure AD
- Open the previously downloaded Azure AD Metadata in a text editor and copy and paste it into the metadata section
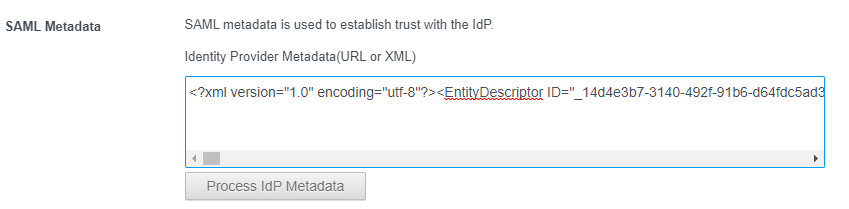
- Click “Process Metadata”
- Under Name ID format mapping, click the plus sign twice
- Add a mapping for “urn:oasis:names:tc:1.1:nameid-format:unspecified” and map it to “userPrincipalName”.
- Add a mapping for “urn:oasis:names:tc:1.1:nameid-format:emailAddress” and map it to “userPrincipalName”.

- Under “Just in Time Provisioning”, leave this blank. See Section on JIT if you are using JIT.
- Under Users, select the user store where the users exist.
- Under Network, select “All Ranges”
- Under Authentication Methods, provide a name such as “AzureADPassword”
- Under SAML Context, select “urn:oasis:names:tc:SAML:2.0:ac:classes:PasswordProtectedTransport”
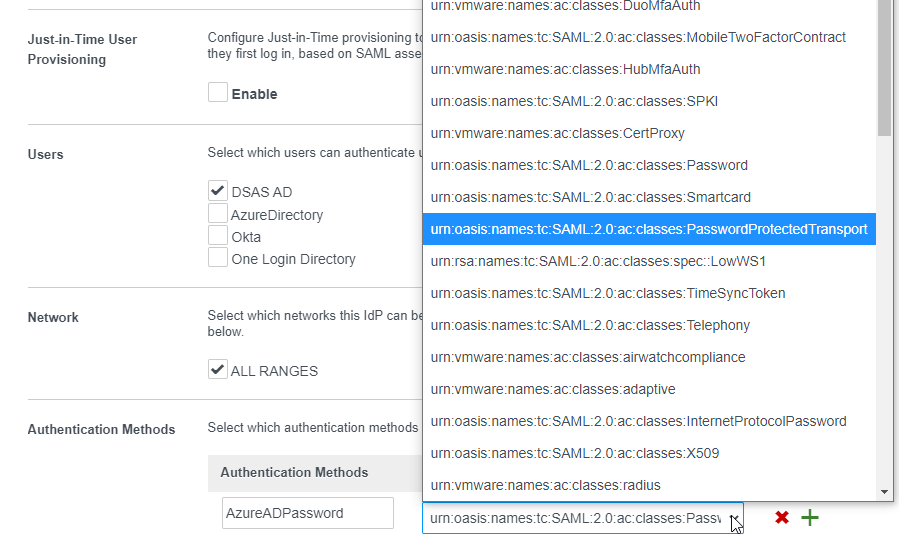
- Create additional Authentication Methods as required
- Enable Single Logout
- Click Add
Workspace ONE Access Policy
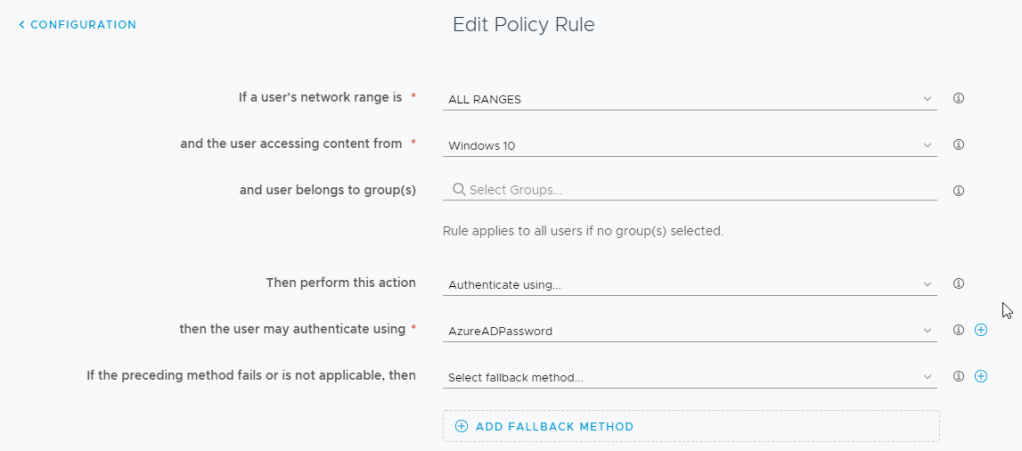
- Click on Identity & Access Management -> Policies
- Edit your appropriate policy to include the new Azure AD Password Method and save.
Testing the Configuration
- In a browser, launch your Workspace ONE Access Console
- You should automatically get redirected to Azure AD
- Enter your email and password
- Hopefully, you are authenticated successfully into Workspace ONE Access
- If not, use a SAML tracer to see your response back to Workspace ONE Access

- Verify the Name ID Format and corresponding value match our configuration in Workspace ONE Access. The value in the Name ID should match the userPrincipalName in Workspace ONE Access. Adjust the configuration accordingly to match your environment.

Just-in-Time User Provisioning
While I strongly advise against Just-in-Time User Provisioning as a best practice (because there is no user lifecycle management), I’ll document the steps to configure it as there are many that still want to use it.
Azure AD User Attributes & Claims
We will need to modify the user claims that Azure AD will send to Workspace ONE Access:
Note: Do not add any Namespace with the attribute claims.
| Claim Name | Value |
| user.mail | |
| ExternalID | user.objectid |
| firstName | user.givenname |
| lastName | user.surname |
| userName | userprincipalName Another popular variation: ExtractMailPrefix (user.userprincipalname) |
| userPrincipalName | user.userprincipalname |

Workspace ONE Access 3rd Party IDP Configuration
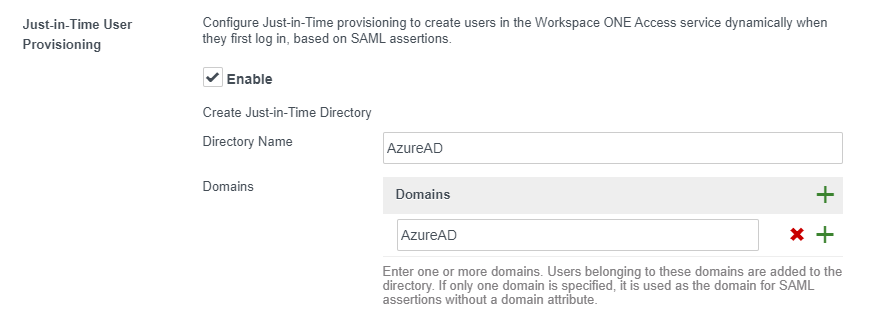
If you are doing JIT into Workspace ONE Access, you will need to enable this when creating the 3rd Party IDP. Enable the Checkbox and provide a directory name and domain name that will be used (internally).
Testing
When you test this configuration, you will see the attributes in the SAML:

If you look at the user which was created in Workspace ONE Access:
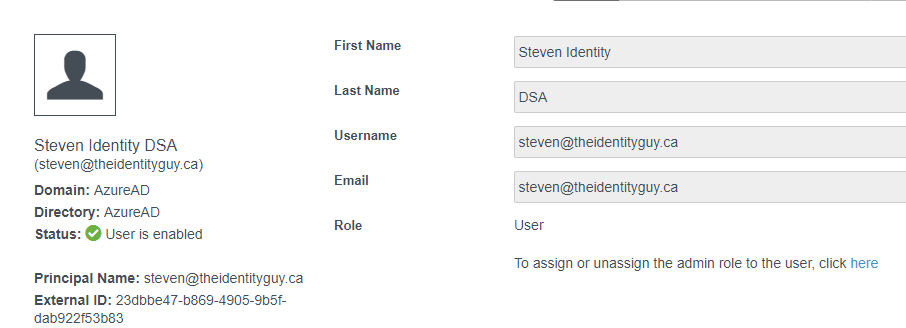
Make note that we are setting the External ID. If you are using Workspace ONE UEM, these two values need to match in both systems. You can use the AirWatch Provisioning Adaptor to create accounts in UEM.
Note: You can NOT update the External ID Attribute on an existing user in Workspace ONE Access.

Can any one tell me what is the External ID Attribute
LikeLike
The External ID attribute is the internal identifier from a external directory source. In Active Directory, it would be the ‘objectGUID’. In an ldap, the ‘nsuniqueID’. The same applies for cloud directories like Azure and Okta. Azure has an identifier called the objectID. You can use any attribute you want for the External Id but it must be unique and can not change. This attribute is important as its the common denominator when Workspace ONE Access talks to Workspace ONE UEM.
LikeLike
Thanks for the response i just sort it out how it works. Thanks a lot
LikeLike
I have done the setting and my user are now showing in the UEM but when I try to enroll them using intelligent hub. giving me error ” Invalid user credentials”
https://kb.vmware.com/s/article/50101127?lang=en_US
LikeLike
Hi Suliman, when you enrolled via the Intelligent Hub, did it redirect to Workspace ONE access -> Azure AD?
LikeLike
Hi Steveidm . When i enroll using intelligent hub it redirect me to Azure AD after user and pass then it redirect me to access page and then white screen on the phone..
when i try the same on the laptop with XXX.awmdm.com/enroll its ask for my group id then Azure and then ACCESS page and (SAML authentication has timed out; please try your request again.) this error. i also try saml tracer but did understatnd it.
LikeLike
So a couple things to hopefully get you on the right track.
-Do you see the traffic going through WS1 Access? Check the Audit Log and make sure the authentication request is there and properly maps to the user.
-Do you have Hub Services fully enabled in WS1 UEM? This integration requires Hub Services to be enabled and WS1 Authentication configured.
-The Flow through Web Enrollment (/enroll) doesn’t use Hub Services and will use the SAML configuration in Directory Services (UEM).
-Make sure UEM/WS1 Access have users created that have the same External ID.
LikeLike
In My azure User Attributes & Claims i used objectGUID = user.objectid and your documents its
External ID = user.objectid .. also in my airwatch provision app my External ID = user.objectid
i also add identity&access management>>user attributes>> Add other attributes to use >>objectGUID
when i add uem with access in that there is also External ID = UserObjectIdentifier
LikeLike
Do you see the traffic going through WS1 Access? Check the Audit Log and make sure the authentication request is there and properly maps to the user. (access and working and show user details in the log and audit event)
Do you have Hub Services fully enabled in WS1 UEM? This integration requires Hub Services to be enabled and WS1 Authentication configured. ( In access network default network policy is already there with HUB enable)
The Flow through Web Enrollment (/enroll) doesn’t use Hub Services and will use the SAML configuration in Directory Services (UEM). ( OK i got it. will do the testing on hub only)
Make sure UEM/WS1 Access have users created that have the same External ID. ( this one is tricky, I change is as per documents)
Now i m getting new error when enrolling using hub (failed to lookup for subscription to resource)
Is it possible to get your email or send me email so we can chat there. shaheen_suliman@hotmail.com
LikeLike
The failed to lookup subscription sounds like you don’t have Hub Services enabled in UEM. I recommend you open a VMware Support ticket and they can walk you through it. I think I should put out a blog on this but in the mean time, support is the best option.
LikeLike
There are two user . i have two app in access one is airwatch provision which move user from access to uem. and the second is AirWatch Mobile Device Management . both user are add into the provision app to move them to uem and one user is add in to the AirWatch Mobile Device Management . (failed to lookup subscription) only coming to the user which is assign to the airwatch mobile device management and the other is getting the white screen in hub after azure auth.
LikeLike
At this point, I recommend you work with support to make sure you have the correct configuration.
LikeLike
Team, appreciate if you can help. we have SAP cloud apps integrated with azure AD, we are introducing WorkspaceOne for MDM, what is the best we can do for SSO? as per VMWare we need either to have federation with ADFS or Workspace one, we cant do with azureAD because you cant control to direct only mobile trafic to workspace where this is available in ADFS. the problem is that we have managed domain and we dont want to go back to federated domain.
LikeLike
If you are looking to take advantage of Mobile SSO, you will need to enable federation to either Workspace ONE or another IdP. If you are only looking for compliance information, WS1 UEM has a capability to update Azure AD. Please see the VMware docs on that feature.
LikeLike
Have you had any luck with using Windows Hello and Azure SSO as the WS1 IDP? We get an error that states that the requested method “x509, MultiFactor” does not match the requested authentication method. Users who don’t use Windows Hello can log in normally.
Thanks for your great articles!
LikeLike
Hi Dan – Not sure if I can help but I will try to point you in the right direction. I’m assuming you are using “urn:oasis:names:tc:SAML:2.0:ac:classes:Password” when you send the auth to Azure from WS1. You need to get the right Authentication Method as Azure will actually validate that if you requested password, you need to authenticate using password. Check out this blog I wrote that will hopefully point you in the right direction https://theidentityguy.ca/2021/02/25/workspace-one-access-best-practices-in-policy-management/#fallbacks
LikeLike
Hi Steve,
I was finally able to work this out with VMware support. The answer was to change from Password to Unspecified in the IDP settings in WS1. After that, Windows Hello sessions were able to authenticate.
Thanks for your help!
Dan
LikeLike
Hi Steve, used your guide to config SAML auth for our new Horizon/Workspace One environment. Only issue is after I log into WS1 via SAML (which works fine) when I start a desktop the desktop level authentication fails and prompts to manually enter my username and password (which then works). Looking in the desktops security event viewer its passing my username incorrectly. Its adding @domain.com to the end of the UPN. For example ‘j.smith@domain.com@domain.com’.
Any ideas?
LikeLike
Hi Max – there are a LOT of factors that could be in play here. Have you configured True SSO? Did you use any of the testing tools that are out there for True SSO? In the horizon logs, you should see of some information as well. I have a few horizon blogs but not has much as some other sites. Take a look at my understanding the SAML between Horizon and WS1 Access Blog. The Horizon Logs should give you more information.
LikeLike
Hi Steve, this is really interesting blog, i need to confirm that i understand it correctly because this is what i really need but we consulted VMWare earlier and they said you cant achieve seamless SSO on mobile device applications if Workspace is not the the Idp, they said that we have either to federate with Workspace or ADFS. is this solution confirmed to provide seamless sso for AzureAd and ADFS integrated Apps?
LikeLike