02/25/2021 Update: Blog updated to support Certificate Authentication to Workspace ONE UEM
The AirWatch Provisioning App within Workspace ONE is still relatively new and although it has it quirks, it can still be useful in certain use cases.
So what is the AirWatch Provisioning App used for?
The app is designed for the use cases where there is no on premise ldap server that can be used with the Workspace ONE UEM Cloud Connector to synchronize users. This app can be used when users are created in Workspace ONE Identity via SCIM or JIT. Workspace ONE Identity will then create the users in Workspace ONE UEM.
Lets first discuss some important information about using the AirWatch Provisioning App in Workspace ONE:
- Currently, Workspace ONE will only provision at the top level (Customer) Organization Group (OG) in Workspace UEM.
- An LDAP Server can NOT be configured at the top level OG in Workspace ONE UEM (unless the users exist in the directory that will be created – but if this is the case, you shouldn’t be using the provisioning adapter)
- Workspace ONE Access needs to be configured as a SAML Provider at the top level OG.
- If you are using JIT to create users in Workspace ONE Identity, you MUST send a valid GUID to Workspace ONE has part of the SAML attributes. This is required if you plan on using the Workspace ONE Hub native application to enroll your device. This GUID will be mapped to the External ID and provisioned to Workspace ONE UEM. See https://www.uuidgenerator.net/ as an example.
- If you are using JIT to create users in Workspace ONE Identity, you need to use a web browser to log into Workspace ONE initially before using the Workspace ONE Hub native app. This limitation is because the user needs to exist in UEM at the time of enrollment.
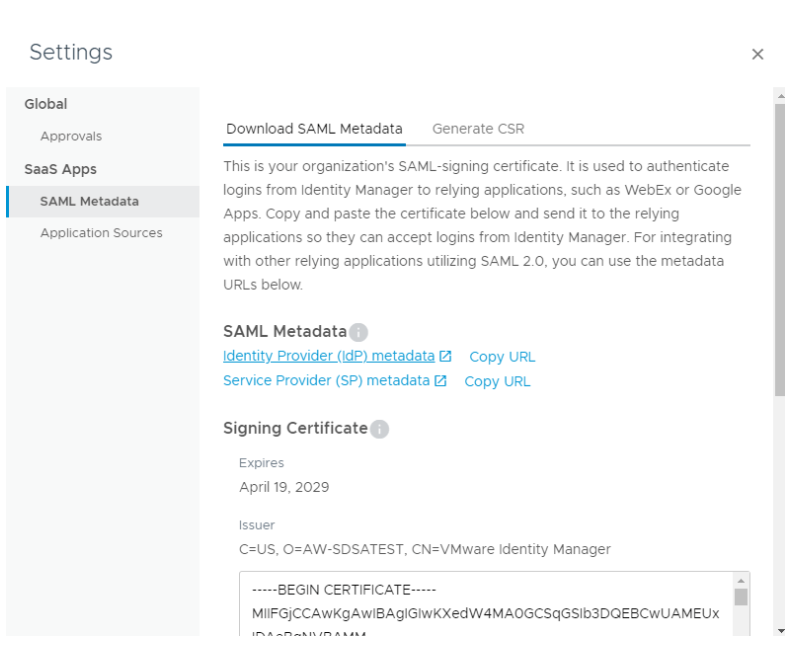
Step 1: Export your Workspace ONE IDP Metadata
- Log into Workspace ONE Identity and go to Catalog -> Settings
- Click on SAML Metadata
- Download your “Identity Provider (IdP) metadata”
Step 2: Configure UEM to use SAML Authentication
- Log into Workspace ONE UEM
- Go to Group & Settings -> All Settings -> System -> Enterprise Integration -> Directory Services
- Ensure Directory Type is set to “None”
- Enable “Use SAML for Authentication”
- Under Enable SAML Authentication for*, check Self-Service Portal and Enrollment.
- Enable “Use New SAML Authentication Endpoint”
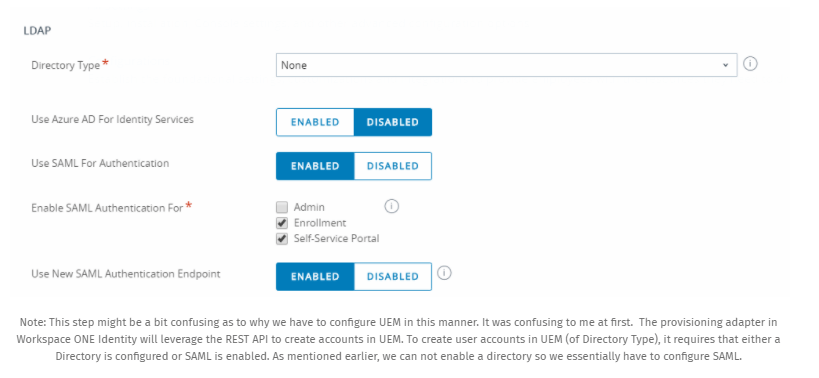
- In the SAML 2.0 section, click upload to Import Identity Provider Settings
- Select the metadata you downloaded in Step 1.
- Scroll down and click save.
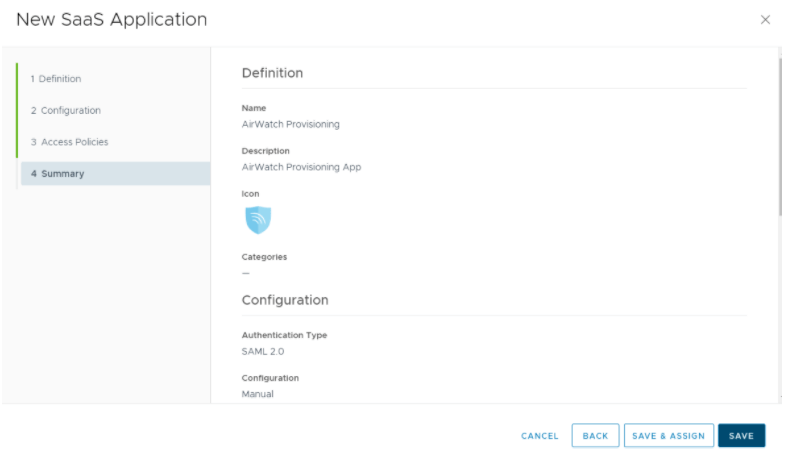
Step 3: Add AirWatch Provision App in Workspace ONE Identity
- In Workspace ONE Identity, go to Catalog-> New
- Browse from the Catalog and select “AirWatch Provisioning”
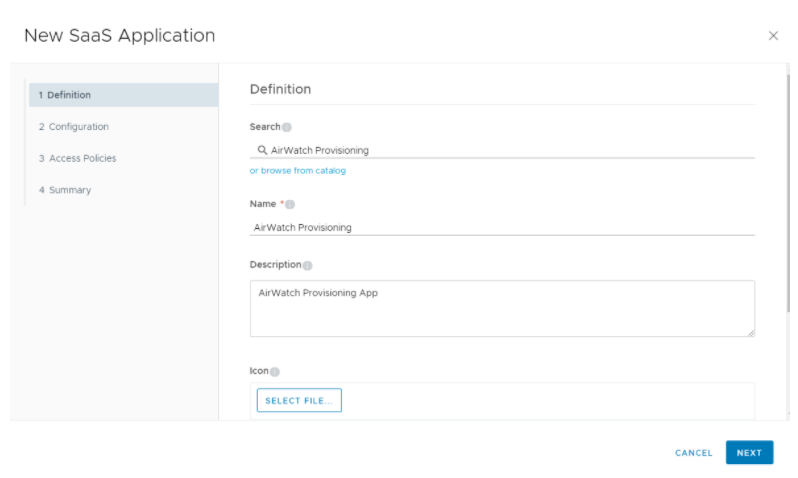
- Click Next
- Edit the Single Sign-On URL and Recipient URL with your UEM server
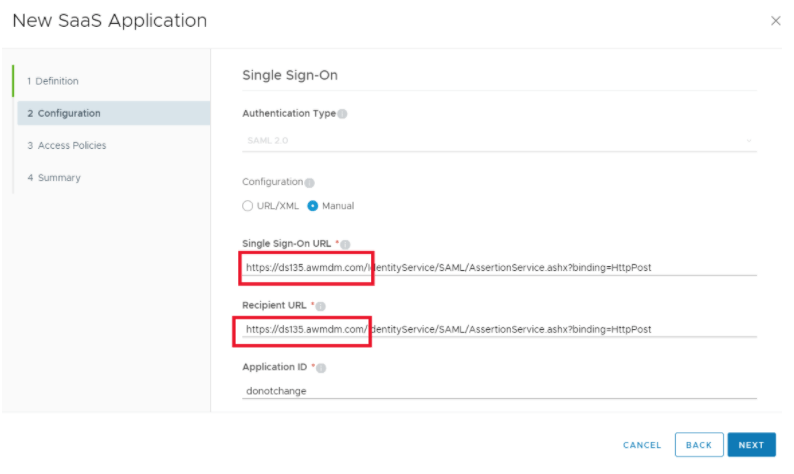
- Keep the “default_access_policy_set” and Click Next
- Click Save
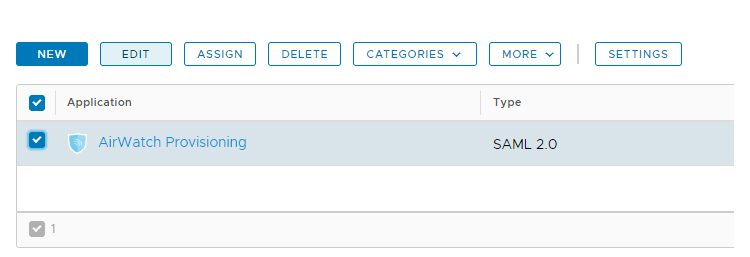
- Select the AirWatch Provisioning App and Click Edit
- Click Next
- On the Configuration Tab, enable “Setup Provisioning”
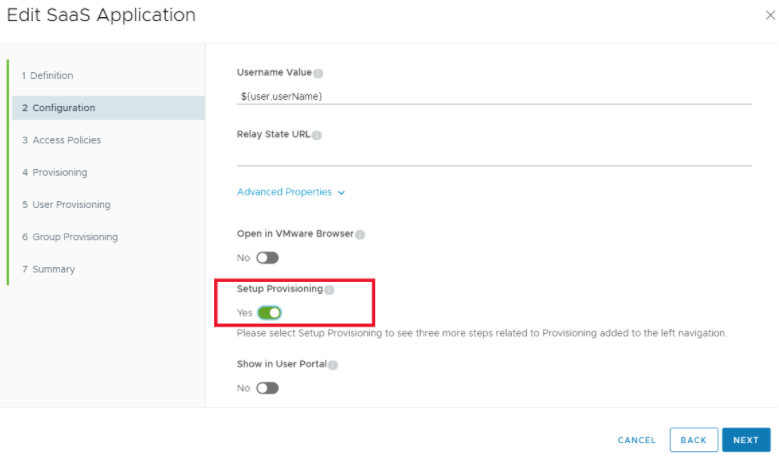
- Click Next
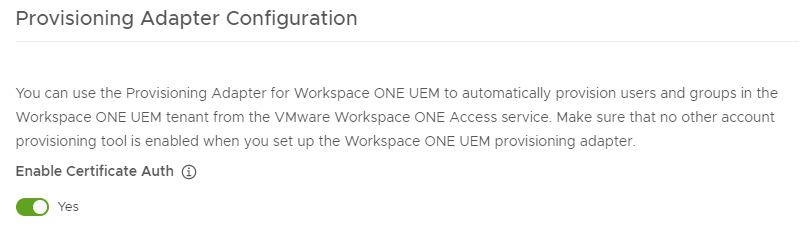
- Click the slider to enable Certificate Auth (Note: This assumes you’ve already enabled Workspace ONE UEM with Workspace ONE Access -> Identity Access Management -> Setup -> VMware Workspace ONE UEM
- Enter your top level OG Group ID
- Click Test Connection and validate connectivity.
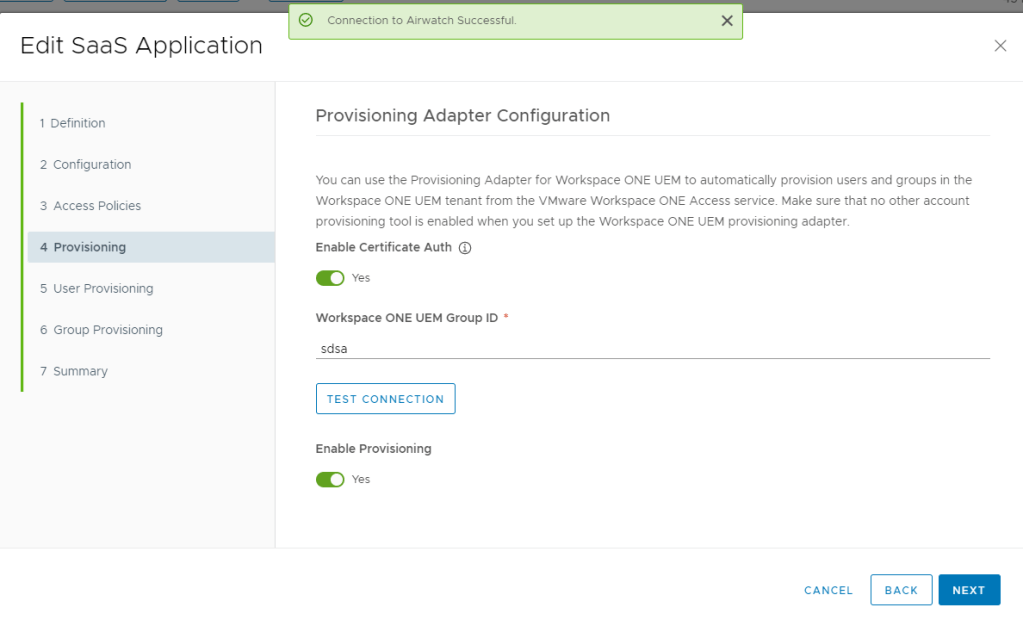
- Click Enable Provisioning and Click Next
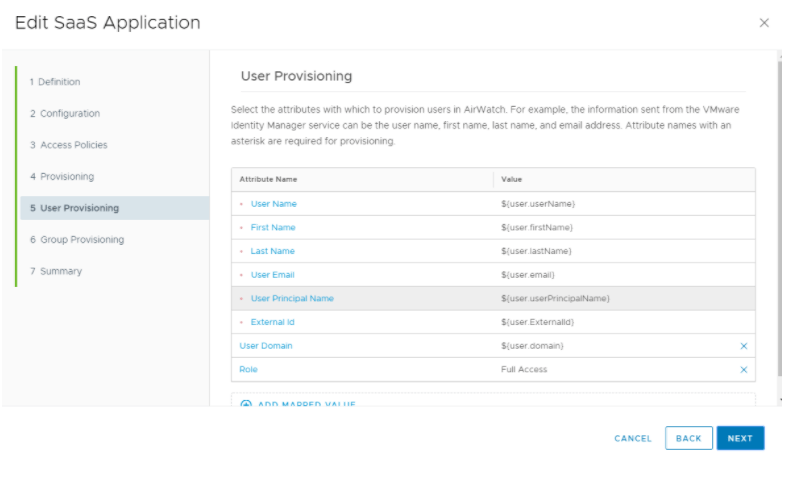
- Verify the mapping are correct. If you are using JIT, make sure all these attributes have come over in the SAML assertion.
- Under Group Provisioning, add any groups you want to provision to UEM.
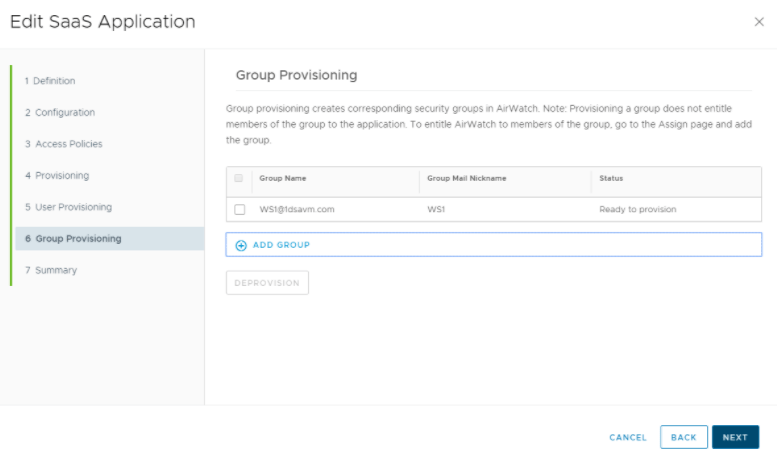
- Click Next
- Click Save
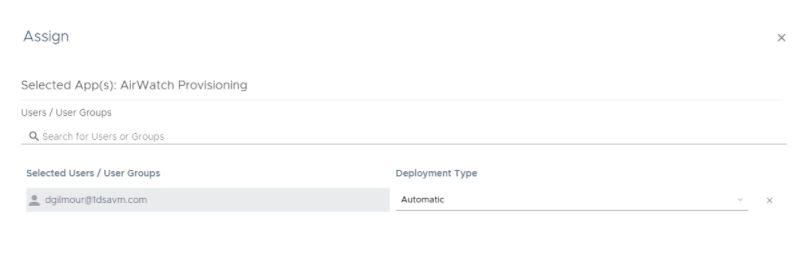
Step 4: Entitle Users to the AirWatch Provisioning App
You have the option of entitling users individually or using a group. If you are using JIT you might want to consider using a dynamic group.
- Click the Assign button on the AirWatch Provisioning App
- Search for the user and/or group
- Under “Deployment Type” you MUST Select Automatic. If you leave the default “User Activated” it will never get provisioned to the user.
Step 5: Create a Dynamic Group (Optional)
If you are using JIT to create users into Workspace ONE, it easier to create a dynamic group and assign that group to the provisioning adapter.
- Click on “Users & Groups”
- Click on Groups
- Click Add Group
- Provide a group name and Click Next
- Do not select any users and Click Next
- Under Group Rules, you can either choose based on the JIT Directory that was created or the domain you chose for the JIT Users

- Click Next
- Click Next to exclude users
- Click Create Group
Troubleshooting
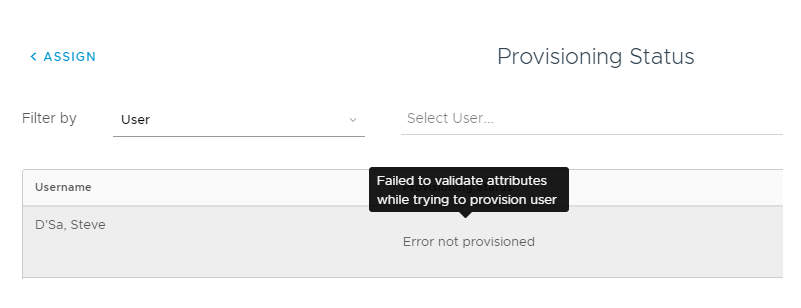
- If you receive the error “Error not provisioned” in the assignment screen and you hover over the error message and see “Failed to validate attributes while trying to provision user” this means that the values for the attributes you used in Attribute Mappings of the provisioning adapter configuration are either null or missing. Please make sure you create the user in Workspace ONE Identity with all the necessary attributes to create the account in Workspace ONE UEM. This includes the External ID. Please see the note at the beginning of the blog regarding the External ID
- While trying to enroll your device with the HUB application application you receive a generic error like “An Error has occurred”. See the note about External ID.
- When trying to provision the Mobile SSO profile you receive an error that the PrincipalName contains an invalid value.
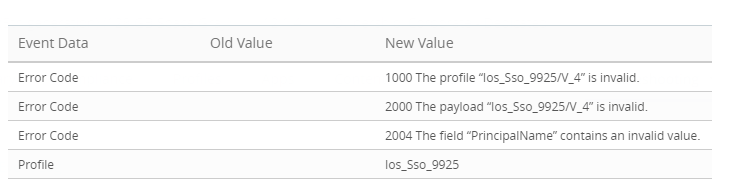
- This means that you have probably created the Workspace ONE UEM account with an email as the Username. When the Mobile SSO certificate payload was created, it uses the username as the principal name on the certificate. Unfortunately you can not have the “@” character in the principle name. You have two choices to resolve this issue:
a) In the AIrWatch Provisioning Adapter mappings, use another attribute to represent the username that does not contain the @ sign. You might need to adjust the values being imported into Workspace ONE identity (whether by JIT or via the connector). Please make sure the username and the prefix of the UPN remain the same.
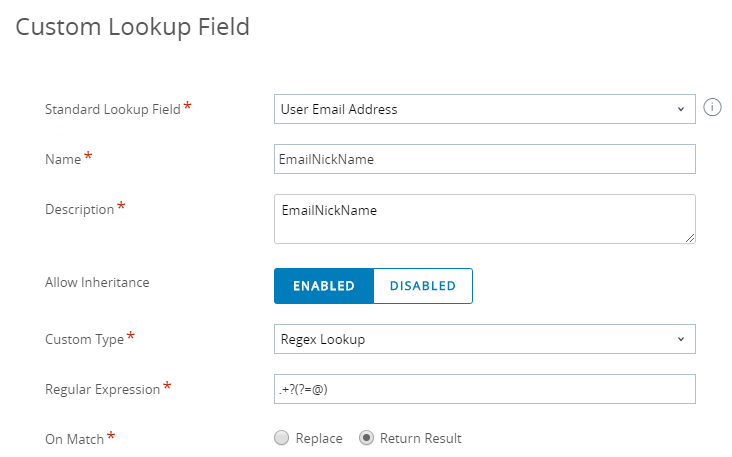
b) Use a lookup in Workspace ONE UEM to parse the prefix of the email address and use that in the certificate payload:
Group & Settings -> All Settings -> Devices & Users -> General -> Lookup Fields
Add Custom Field
Create a Name such as EmailNickName and use a regex such as “.+?(?=@)”
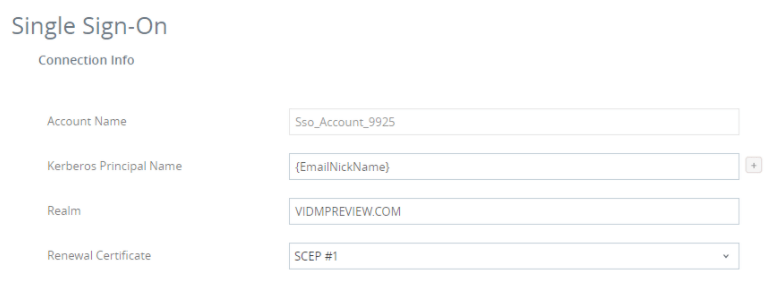
- You can then use “EmailNickName” in your Certificate Payload

Thank you so much for your blog/articles…. You’ve literally saved me tons of hours.
LikeLiked by 1 person
Thanks Dustin for the comment. I used to document a lot for my own use but switched to blogging in hope others can find my content useful.
LikeLiked by 1 person
Hey Steve!
Your articles are great, thanks for the work you are putting into it.
Just a small one for step 1 here: The SAML Metadata is in WS1 Access under Catalog > Web Apps and then Settings. Otherwise it’s a bit misleading 🙂
All the best,
Julius
LikeLiked by 1 person
Hey Steve!
Have you ever experienced a WorkspaceOne UEM instance that was setup with Ldap provisioning via an okta Ldap connector and switching it to the Okta Scim provisioning referenced in these blogs?
I was not involved in the WorkspaceOne integration and the professional services directed them that only Ldap was available, so we have a full environment of ldap provisioned people and we are worried these may break if we switch from Ldap to Scim.
Thanks,
Jason
Note: These Guides/blogs have been amazing, and I truly appreciate the work/expertise you’ve dedicated to them.
LikeLike
Hi Jason – I don’t have a blog on switching from LDAP to SCIM. I’ve never endorsed the use of the UEM LDAP adapter to Okta UD. The thing you need to verify is if the external ID in UEM is currently set and is equal to the external ID in Okta. This is absolutely critical. Theoretically, once you have Access/UEM with the same external ID as with Okta – it “should” work. I would strongly recommending testing with test tenants.
LikeLike