I’ve had quite a few requests lately for assistance setting up SCIM capabilities with OneLogin and Workspace ONE.
In full disclosure, I’ve set this up in my lab but I’ve not done full end to end testing of all CRUD capabilities.
The one obvious difference in the setup and configuration with OneLogin over some of our other partners is the ability to support the Authorization Code Grant Flow. Big Kudos to the OneLogin team.
Lets look at the high level steps:
- Create a directory instance in Workspace ONE Access
- Create a OneLogin Remote App Access Client.
- Configure VMware Workspace ONE application in OneLogin.
Create Directory Instance in Workspace ONE Access
In order to create a directory instance in Workspace ONE Access, we’ll need to use the API because the type of directory required for this integration can not currently be done using the Admin Console. In the following steps we’ll use Postman to run the necessary API calls.
- We will need an Oauth Token in order to use the API. Please see my other blog on your options on getting an OAuth Token
- Open a new tab in Postman, Select POST and the method.
- For the URL, enter: https://TENANTURL/SAAS/jersey/manager/api/connectormanagement/directoryconfigs
Replace the Tenant URL with your URL
https://dsas.vmwareidentity.com/SAAS/jersey/manager/api/connectormanagement/directoryconfigs - In the Authorization Tab, Select either BEARER Token or OAuth 2.0 depending on the option you chose in Step 1 to get a token. Select or Paste your Token.
- In the Headers Tab, Set the Content-Type to “application/vnd.vmware.horizon.manager.connector.management.directory.other+json”
- Click on the Body Tab
- Use the following as a sample and Click Send:
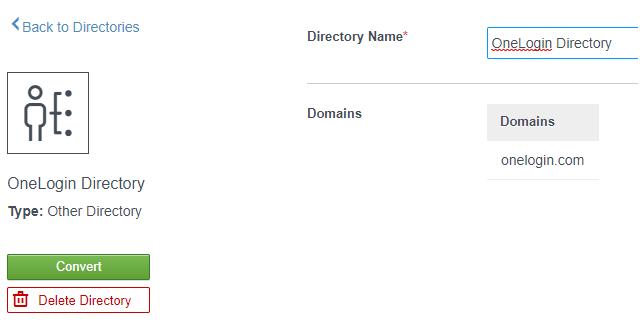
- {
- “type”:”OTHER_DIRECTORY”,
- “domains”:[“onelogin.com”],
- “name”:”OneLogin Directory”
- }
- In the Workspace ONE Admin Console, verify that the directory is created and is associated with the correct domain.
Create a OneLogin Remote App Access Client
We will now create a OneLogin Application in Workspace ONE Access which will be used by OneLogin to create/update/delete users in Workspace ONE.
- In the Workspace ONE Admin Console, go to Catalog -> Webapps
- Click New (Top Left)
- Enter a Name ie. OneLogin SCIM
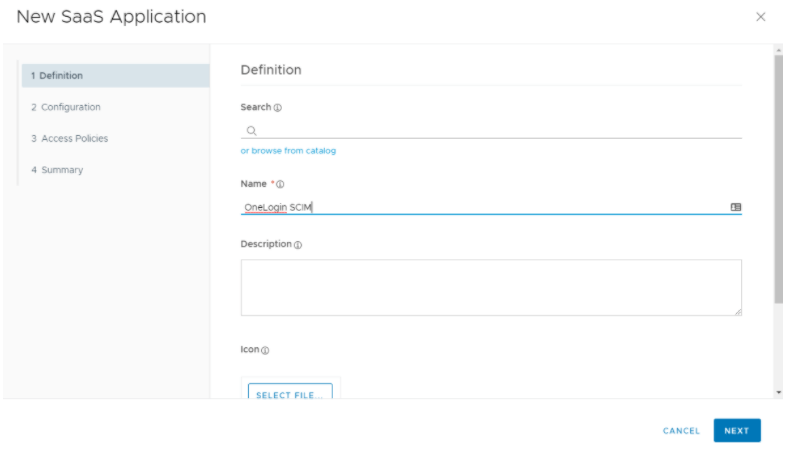
- Click Next
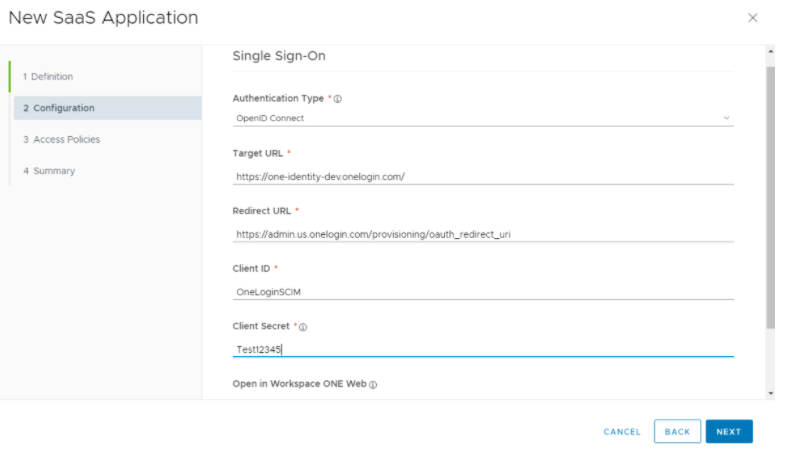
- On the configuration page, you will need to enter:
Authentication Type: Open ID Connect
Target URL: Enter your OneLogin Tenant ie. https://tenant.onelogin.com
Redirect URL:https://admin.us.onelogin.com/provisioning/oauth_redirect_uri
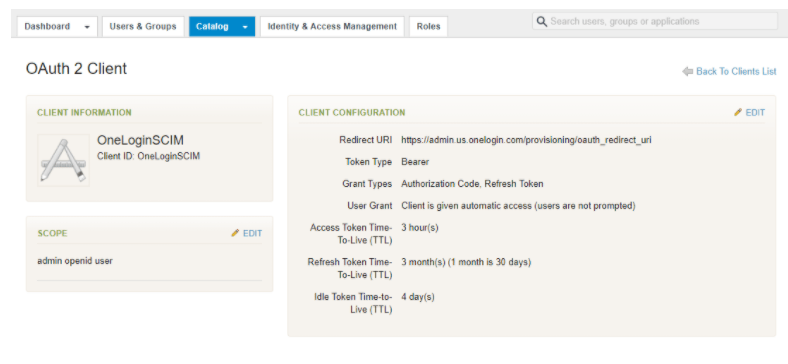
Client ID: Enter a value for the Client ID: ie. OneLoginSCIM
Client Secret: Enter a value for the Client Secret ie. Test12345
Show in User Portal: NO
This wizard will create a new remote app access client that will be used by OneLogin. You can see the client which was created by going to Catalog -> Settings -> Remote App Access.
Warning: Do NOT edit the scopes. You will not be able to re-add the Admin scope if you do.
Configure VMware Workspace ONE application in OneLogin.
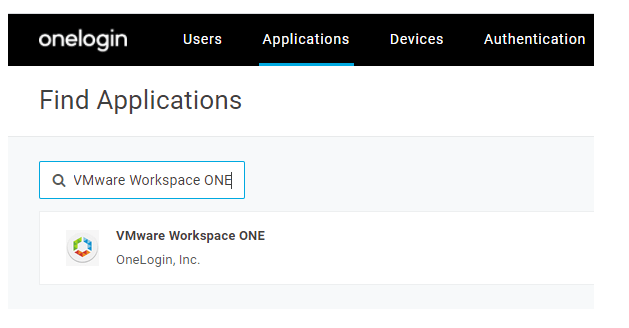
- In the OneLogin admin console, search for “VMware Workspace ONE” under Applications
- Select and Click Save
- Click on Configuration on the left menu
- Under SCIM Base URL, enter: https://%5Btenant%5D.vmwareidentity.com/SAAS/jersey/manager/api/scim
ie. https://dsas.vmwareidentity.com/SAAS/jersey/manager/api/scim - Under VMware Site, enter your tenant URL. This will be used as the Oauth Authorization Server URL.
ie. https://dsas.vmwareidentity.com - Under Client ID, enter the client ID you used in the previous step
- Under Client Secret, enter the secret you used in the previous step.
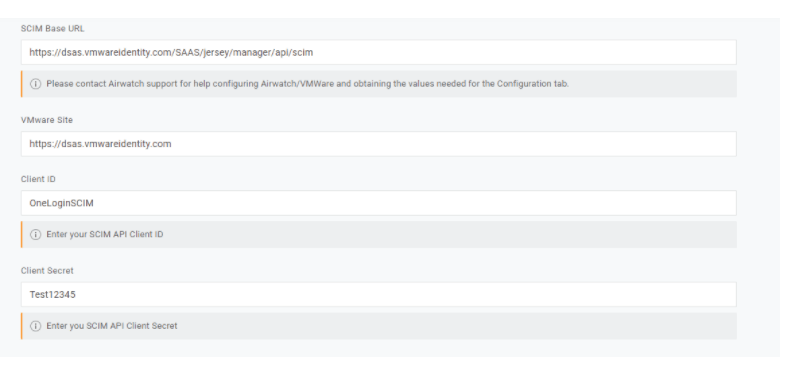
- Click Save
Please don’t forget to hit SAVE! - Go back to the Configuration Tab
Before you Continue, you need to make sure your Policy in Workspace ONE Access will allow you to authenticate using System Domain credentials without using the backdoor. You will need a policy similar to below. The Password (Local Directory) needs to be a fallback.

- Under API Connection, Click Authenticate
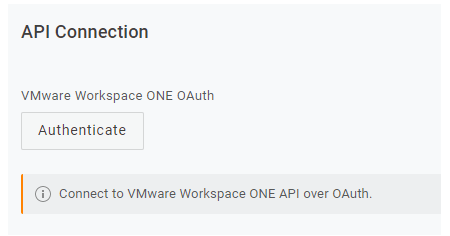
- In the pop up, click VMware Workspace ONE
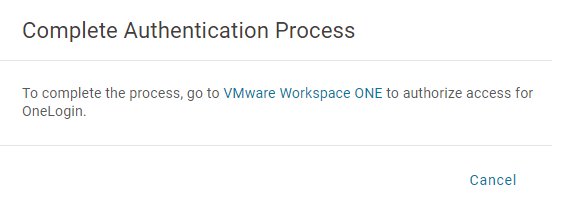
- When prompted to Authenticate, Select System Domain
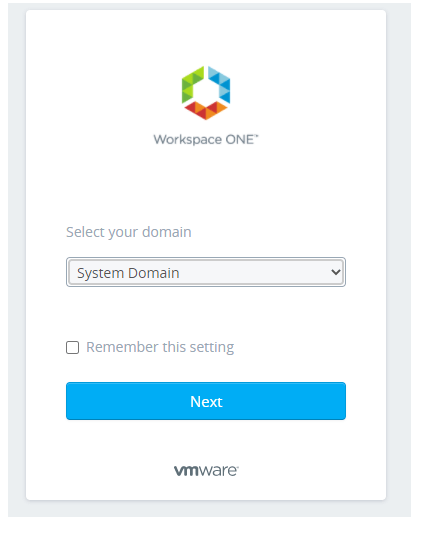
- Enter your Credentials
- You should be returned back to the One Login Portal with a Successful Authorization

- Click on the Parameters Tab
- We will need to map the attributes appropriately that will be sent to Workspace ONE.
In order to map the attributes correctly, we will need to understand how users are created in in OneLogin. Take a look at your users to ensure all the required attributes are set for all users that will be provisioned to Workspace ONE Access. Attributes such as Username, External ID and User Principal Name are typically set if you have an external directory server. If you are creating users directly in OneLogin without a directory server you will need to select different attribute mappings. - Map the attributes appropriately:
Distinguished Name: Distinguished Name
Email Address: Email
External ID: If ALL users are created in OneLogin from a directory server, select ExternalID
If some users are created locally in OneLogin, select Internal ID.
First Name: First Name
Last Name: Last Name
Name ID: Email
SCIM Username: If ALL users are created in OneLogin from a directory server, select Username. If some users are created locally in OneLogin (without a username) , select Email.
User Domain: Enter value used as the domain when creating the directory in Workspace ONE Access
User PrincipleName: If ALL users are created in OneLogin from a directory server, select User Principal Name If some users are created locally in OneLogin, select Email - Click Save
- Click Provisioning on the left menu, and enable the Provisioning Checkbox.
- Click Save
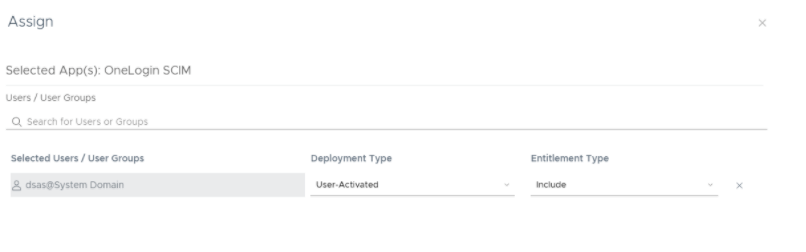
- Assign a user the application and verify it successfully provisions

