
In many of the SCIM integrations we have with various partners, they typically require a bearer token for user provisioning into Workspace ONE Access. In an ideal scenario, we would like to use an Authorization Code Grant flow for SCIM integrations however that is not always possible. In Workspace ONE Access, each customer has their own (tenant) specific endpoint for OAuth operations. This causes a problem for many of our integration partners to support the Authorization Code grant flow in their Workspace ONE catalog application. Given that limitation, we can only use the bearer token approach.
If you’ve followed our public documentation (or one of my blogs), you would of seen instructions on how to generate a bearer token for use with a SCIM provider. Those instructions will walk you through a Client Credentials based OAuth Flow along with an admin scope to generate a bearer token.
In this blog, I’m going to walk you through a very roundabout way of getting a bearer token that will allow you to perform SCIM operations but without everything else included in the admin scope. We are going to use Postman with an Authorization Code Grant Flow to generate a reduced scope bearer token that we can use with a SCIM Provider.
- Create a SCIM role in Workspace ONE Access
- Create a SCIM service account
- Create a Remote App Access Client using Postman
- Generate Bearer Token in Postman
Warning! If you disable the service account, reset the password or modify the OAuth Secret it will invalidate the token. You will need to regenerate a new one.
Create a SCIM role in Workspace ONE Access
Note: This step assumes that you have already created a directory instance (of Type OTHER) in Workspace ONE Access with an associated domain.
- In the Workspace ONE Access Admin Console, Click on Roles
- Click Add
- Provide a Name ie. SCIM Service Role
- Click Next
- Click the Pencil icon beside Users and Groups
- Select “Manager user” under Actions
- For resources, select “Some”
- In Conditions, select “Domain”
- Enter the domain that was created when you initial created the directory (type OTHER) instance using Postman.
- Click the “+” sign in the Action Row
- Select “Manage Group” (Note: The only resources available is “All”)
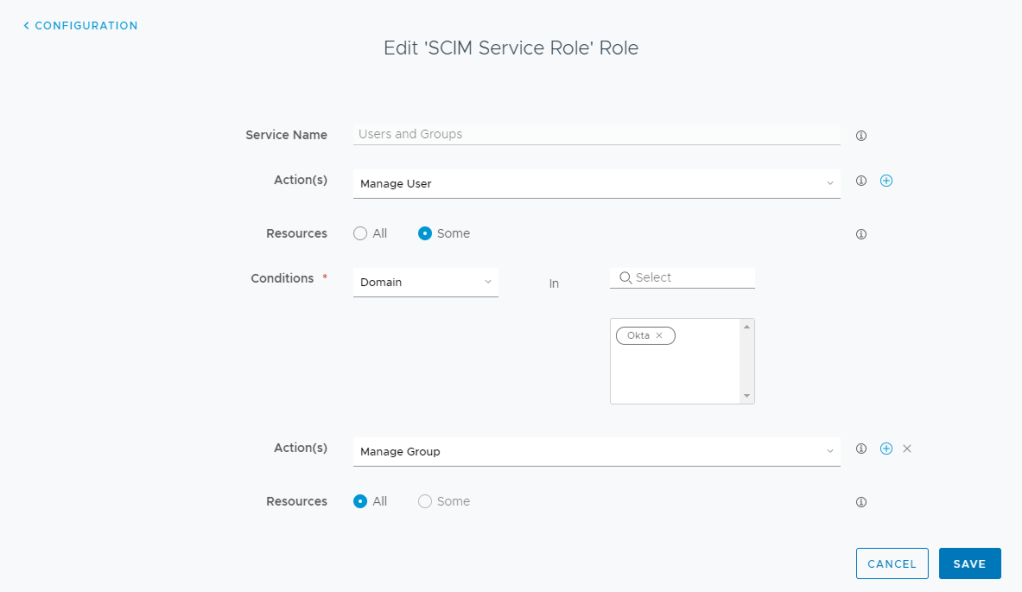
- Click Save

- Click Save
Create a SCIM service account
- Under Users & Groups
- Click Add User
- Select System Directory & System Domain
- Provide a valid email (this is required to set the password for the account)
- Add the remainder of the required attributes and click add
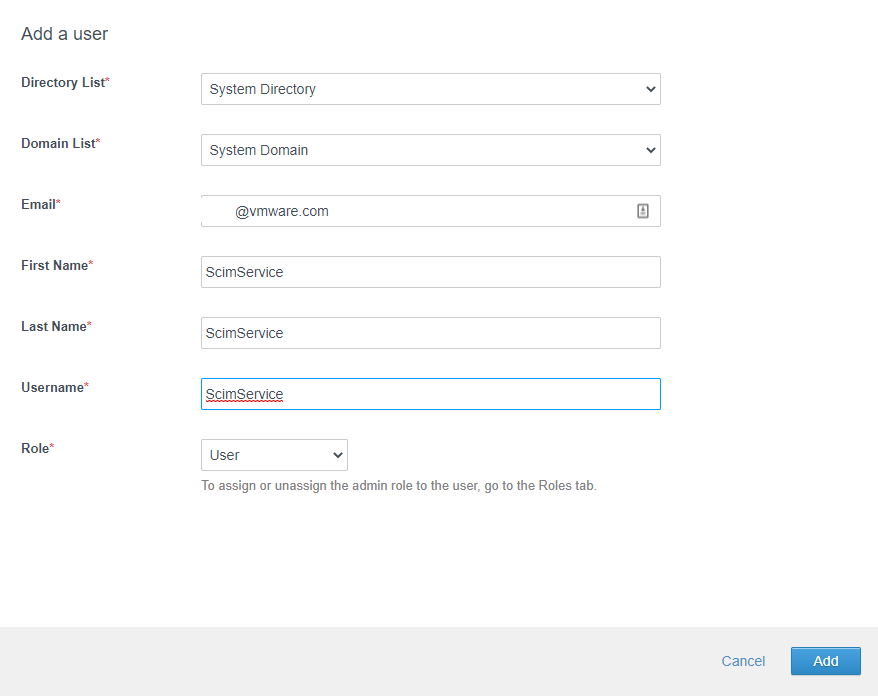
- When you receive the email, set a very secure password (Note: you may have to open the link in an incognito window if you already have a session open).
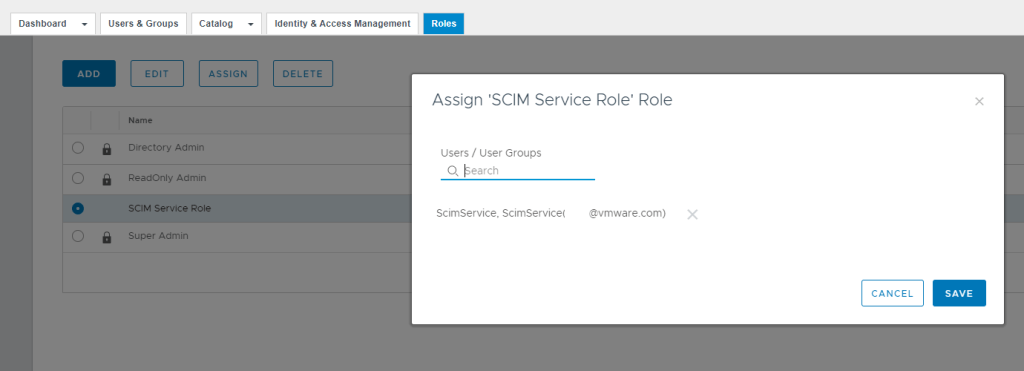
- Click on the roles tab and assign the SCIM service account to the SCIM Role.
Create a Remote App Access Client using Postman
In this section we are going to create a new remote app access client. We will need to use Postman to complete this section as all the options we need in the remote app access client are not available in the user interface.
- In Postman, open a new tab.
- In the Authorization Tab, you will need to select or get a new Access Token. If you do not have an access token already, please follow the steps to acquire an access token in my previous blog: https://theidentityguy.ca/2020/11/10/using-postman-to-manage-workspace-one-identities/
- For the HTTP method, select “POST”
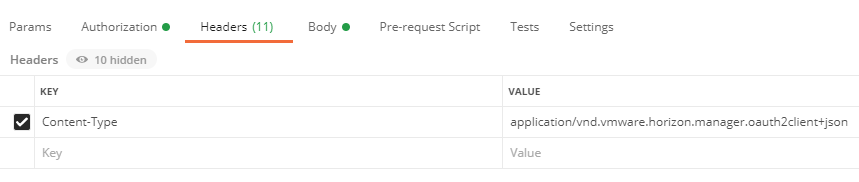
- In the Headers Tab, add a new “Content-Type” which is set to “application/vnd.vmware.horizon.manager.oauth2client+json”
- In the URL, enter https://TENANTURL/SAAS/jersey/manager/api/oauth2clients
Replace TENANTURL with your tenant URL: ie. https://dsas.vmwareidentity.com/SAAS/jersey/manager/api/oauth2clients - In the body section, use the following as a reference:
clientID = Any Unique Client
secret = Select a long unique secret
accessTokenTTL= This value is in minutes. This will determine how long your generated access token is valid. In my sample below, my value is set for 3 years:
refreshTokenTTL= Technically this value is not used
{
    "clientId": "SCIMClient",
    "accessType": "User Access Token",
    "secret": "ti1BM3KeasdfkjhsflkjsdfG7yGkTWYXZ4yFuu5XzRGTKx5I5",
    "scope": "admin user profile",
    "authGrantTypes": "authorization_code refresh_token",
    "redirectUri": "https://oauth.pstmn.io/v1/callback",
    "tokenType": "Bearer",
    "tokenLength": 23,
    "accessTokenTTL": 1576800,
    "refreshTokenTTL": 30,
    "refreshTokenIdleTTL": 5760,
    "rememberAs": null,
    "resourceUuid": "00000000-0000-0000-0000-000000000000",
    "displayUserGrant": true,
    "internalSystemClient": false,
    "activationToken": null,
    "strData": null,
    "inheritanceAllowed": false,
    "returnFailureResponse": false
}- Click Send. You should received a 201 Created Response.
- In Workspace ONE Access, if you go to Catalog -> Settings -> Remote App Access, you should see your new client created
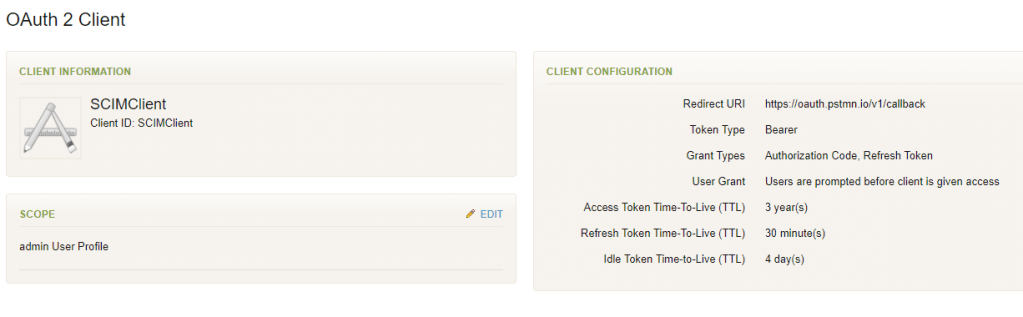
Warning: Do not edit the scopes as you will lose the required Admin Scope.
Generate Bearer Token in Postman
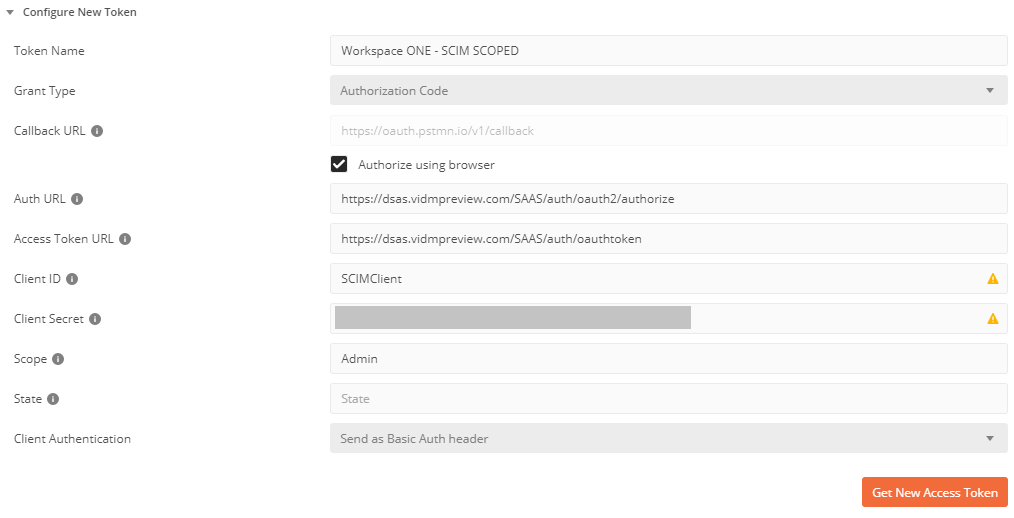
Now that we have a Remote App Access Client, we will use Postman to generate a Bearer token using the Authorization Code Grant Flow.
- Open a new Tab in Postman
- In the authorization section, select “OAuth 2.0” as the type
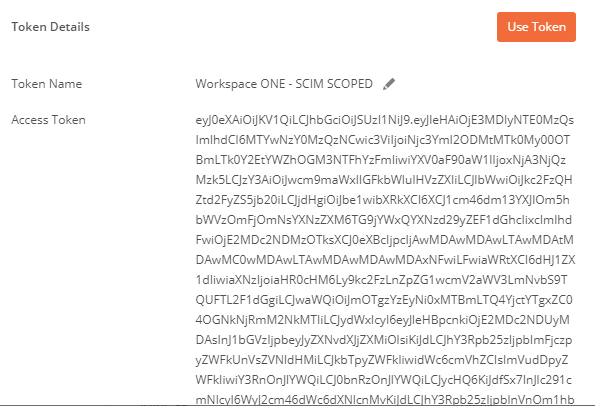
- On the right side, under “Configure New Token” – Provide a Token Name (ie. Workspace ONE – SCIM SCOPED)
- For the Grant Type, select “Authorization Code“
- Under “Auth URL”, enter https:[Tenant URL]/SAAS/auth/oauth2/authorize
ie. https://dsas.vidmpreview.com/SAAS/auth/oauth2/authorize - Under “Access Token URL”, enter https:[Tenant URL]/SAAS/auth/oauthtoken
ie: https://dsas.vmwareidentity.com/SAAS/auth/oauthtoken - Under Client ID, enter your Client ID from above
- Under Secret, enter your secret from above.
- Under Scope, enter “Admin”.
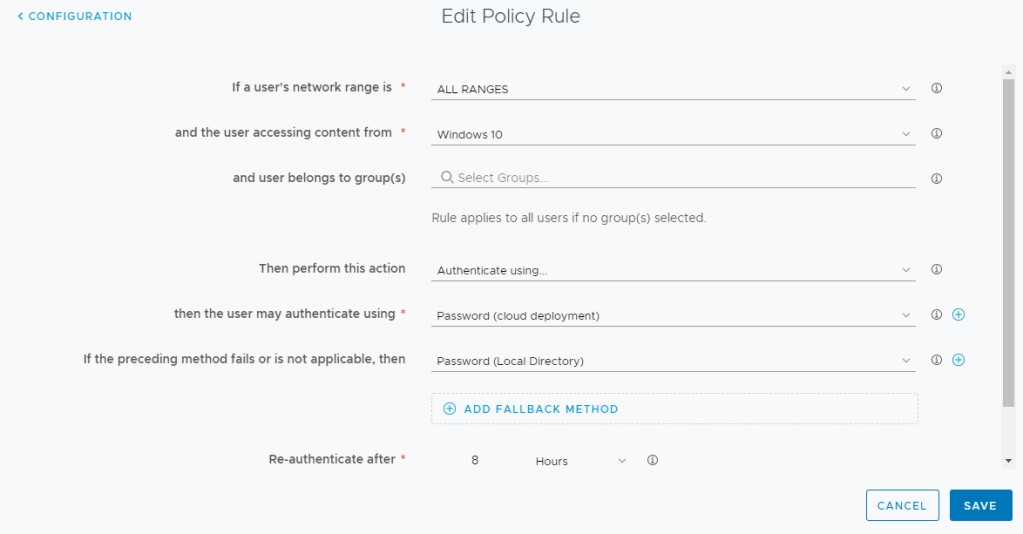
Before you Continue, you need to make sure your Policy in Workspace ONE Access will allow you to authenticate using System Domain credentials without using the backdoor. You will need a policy similar to below for the platform you are using Postman. The Password (Local Directory) needs to be one of the fallbacks (or primary). You will also need to log out of Workspace ONE Access.
- Click Get New Access Token
- Postman will launch a browser session. When prompted to Authenticate in Workspace ONE Access, select System Domain
- Enter your SCIM Service Account and Password that you previously created.
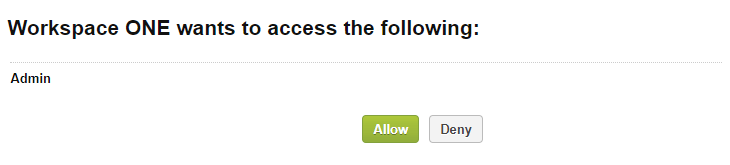
- Select Allow
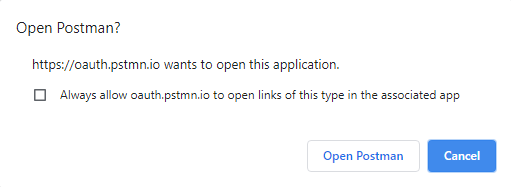
- Click “Open Postman”
- Postman will open with a new token. This token can now be used in your SCIM Provisioning Application.
If you need to update your SCIM Role for whatever reason, you will need to generate your bearer token.
Warning: Never use a local group in Workspace ONE Access to assign admin roles. Although scoping down the bearer token reduces your attack service, it will still allow you to add users to local groups.
