There are times during troubleshooting where you like to see a particular attribute in Workspace ONE Access and its not displayed in the web portal or times when you would like to update a particular attribute or delete a JIT user.
DISCLAIMER: Please use the API with caution as this can potentially cause issues if not used appropriately. Please do NOT use in Production. Please use at your own risk.
In this blog we’ll walk through a few useful API calls to help in your troubleshooting. For a complete list of API calls and documentation:
VMware Identity Manager API – VMware API Explorer – VMware {code}
Please download and install the latest version of Postman.
Update: This blog has been updated with Postman v7.36.0 steps.
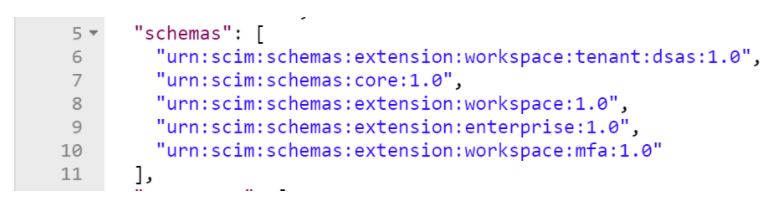
In this blog we’ll go use the following API’s:
- Get Specific User Details
- Update SCIM User
- Delete SCIM User
- Create SCIM User
Step 1: Getting your OAuth Token
In order do use the SCIM based API you need an OAuth token. I’m going to walk through two different ways of getting a token to use in your environment.
If you are going to access a particular environment quite often using postman I would suggest you go with Option 1. If its unlikely you will access a particular environment that often then you should go with Option 2.
Creating an OAuth Application
- Log into Workspace ONE Identity Admin Console
- Click on the Catalog (down arrow) and select Settings
- Click “Remote App Access”
- Click Create Client
- Select “Service Access Token” from the Drop down menu
- Provide a Client ID ie. PostmanClient
- Expand Advanced
- Click Generate Shared Secret (or provide one)
- Make note of the Access Token TTL. This will determine how long your bearer tokens are valid.
- Click Add

- We will configure Postman in the next section.
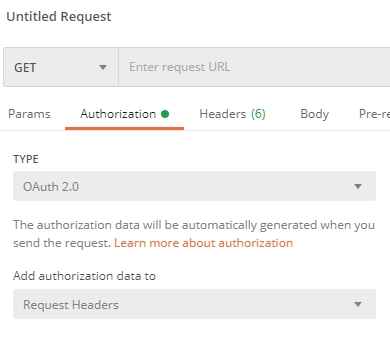
Step 2: Configure Postman to use your OAuth Token
Follow the instructions below to add your OAuth Token
- Open a new Tab in Postman
- In the authorization section, select “OAuth 2.0” as the type:
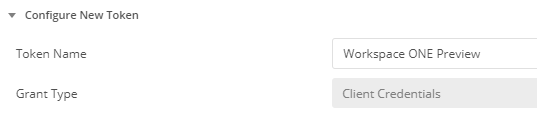
- On the right side, under “Configure New Token” – Provide a Token Name (ie. Workspace ONE – Preview)
- For Grant Type, Select “Client Credentials”
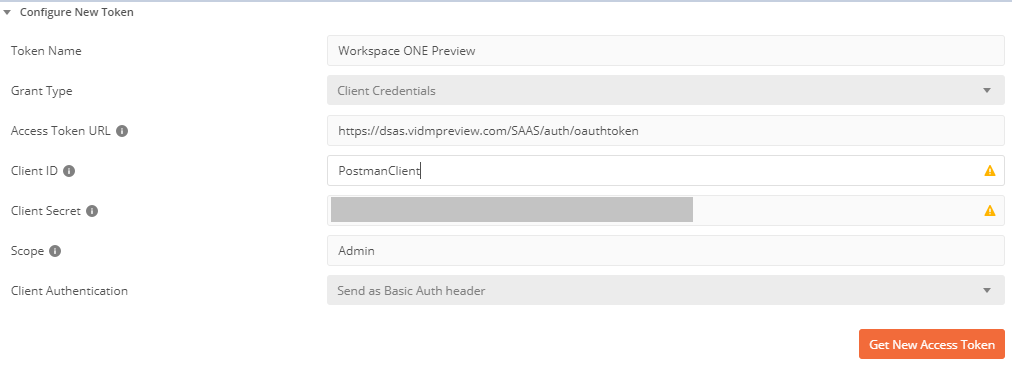
- Under “Access Token URL”, enter https://Tenant URL/SAAS/auth/oauthtoken
ie. https://dsas.vmwareidentity.com/SAAS/auth/oauthtoken - Under Client ID, enter your Client ID from step 1.
- Under Secret, enter your secret from step 1.
- Under Scope, enter “Admin”.
- Click “Get New Access Token”
- Click Proceed
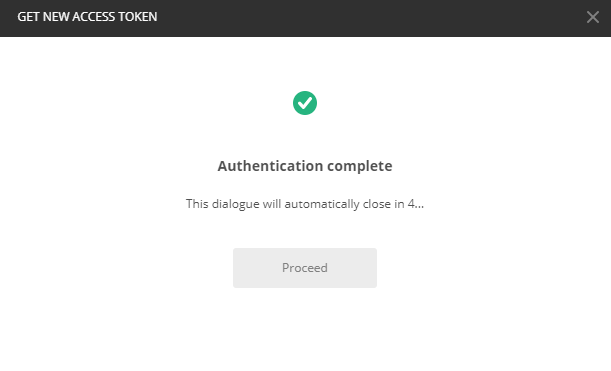
- Click Use Token
- You can see all your tokens in the “Available Tokens” drop down menu in the current token section.
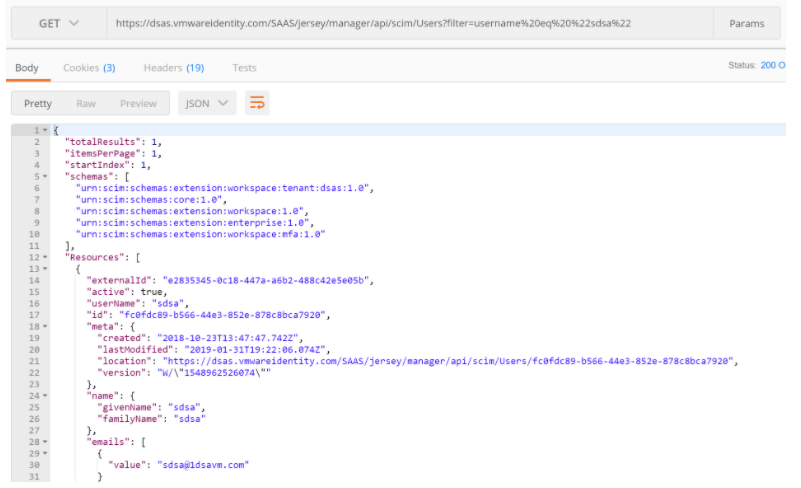
Getting User Details
Now that you have your OAuth token, we can use this token to query Workspace ONE Identity.
- For the HTTP Method, select “GET”
- Enter the following for the URL: https://TENANTURL/SAAS/jersey/manager/api/scim/Users?filter=username%20eq%20%22MyUserID%22
- Replace MyUserID with a username in your environment
ie. https://dsas.vmwareidentity.com/SAAS/jersey/manager/api/scim/Users?filter=username%20eq%20%22sdsa%22 - This will return a complete result set of attributes for the particular user.
Updating User Details
In order to update user details via the API, you will need to collect some information from the Get User Details.
In my example, I’m going to update the “userPrincipalName” in Workspace ONE Access for one of my users.
- Perform a “Get” on the particular user and retrieve the schema information. Please note, this will be different for each tenant as the tenant name is part of the schema.
- Copy this section to notepad.
- Retrieve the section which contains the attribute(s) you want to update
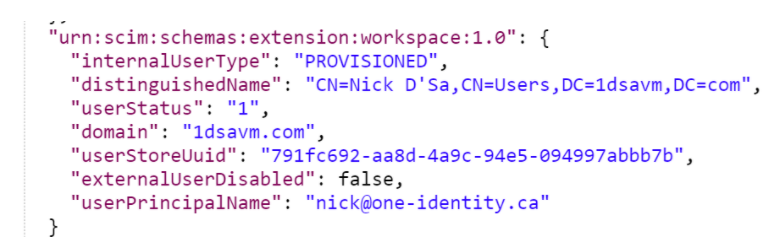
- Copy the ID of the User

- Open a new Tab in Postman
- Add the Authorization Header as per the previous section.
- For the HTTP Method, select “PATCH”
- For the URL, enter: https://TENANTURL/SAAS/jersey/manager/api/scim/Users/{ID}
Replace the Tenant URL with your URL
Replace the ID with the ID from the step 4 in this section.
ie. https://dsas.vmwareidentity.com/SAAS/jersey/manager/api/scim/Users/884b7e7d-6a7b-4985-b113-56235826e8a6 - Select Body
- Enter the JSON in raw text that we’ll post to Workspace ONE
- Select “JSON (application/json)” as the Content-Type
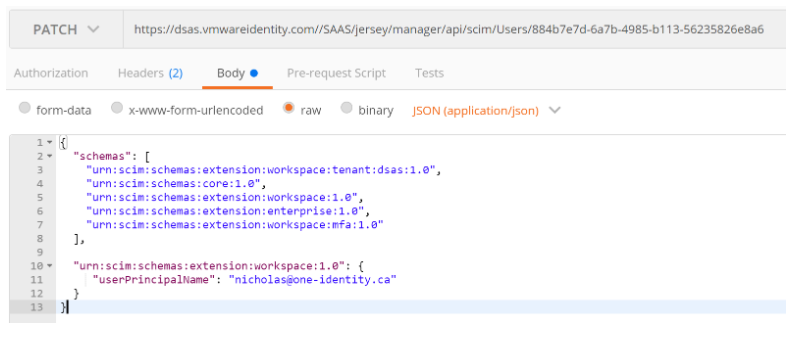
- Click Send
- You should receive a “204 No Content” response
- If you perform a GET User again you should see the value has changed.
Delete Users
If you are using JIT to onboard users into Workspace ONE Identity you’ve probably noticed there is no way to delete users in the web portal. They only way to delete is with the API.
- Perform a “Get” on the particular user and retrieve the ID

- Open a new Tab in Postman
- Add the Authorization Header as per the previous section.
- For the HTTP Method, select “DELETE”
- For the URL, enter: https://TENANTURL/SAAS/jersey/manager/api/scim/Users/%5BID%5D
Replace the Tenant URL with your URL
Replace the ID with the ID from the step 4 in this section.
ie. https://dsas.vmwareidentity.com//SAAS/jersey/manager/api/scim/Users/f6f89782-0a2a-4cc8-84a8-057f1da6ecde - Click Send

- You should receive a “204 No Content” response
- If you perform a GET User again you should see no results found.
Create Users
Creating Users in Workspace ONE Access require a lot more steps. I reluctantly decided to document the steps as this should really be done by the out of the box connectors. The process is slightly different between System Directory, Local Directory, and Other. The “Other” directory is created automatically when setting up the UEM/WS1 Integration.
Creating Users in the System Directory
- Open a new Tab in Postman
- Add the Authorization Header as per the previous section.
- For the HTTP Method, select “POST”
- For the URL, enter: https://TENANTURL/SAAS/jersey/manager/api/scim/Users
Replace the Tenant URL with your URL
Replace the ID with the ID from the step 4 in this section.
ie. https://dsas.vmwareidentity.com//SAAS/jersey/manager/api/scim/Users - Set the Content-Type to “application/json”
- Use the following as a sample:
{
  "schemas": [
    "urn:scim:schemas:core:1.0",
    "urn:scim:schemas:extension:workspace:tenant:sva:1.0",
    "urn:scim:schemas:extension:workspace:1.0",
    "urn:scim:schemas:extension:enterprise:1.0"
  ],
  "userName": "testing4@mydomain.com",
  "name": {
    "givenName": "first4",
    "familyName": "last4"
  },
  "emails": [
    {
      "value": "testing4@mydomain.com"
    }
  ],
  "password": "Password$!"
}
Creating Users in a Local Directory
- Open a new Tab in Postman
- Add the Authorization Header as per the previous section.
- For the HTTP Method, select “POST”
- For the URL, enter: https://TENANTURL/SAAS/jersey/manager/api/scim/Users
Replace the Tenant URL with your URL
Replace the ID with the ID from the step 4 in this section.
ie. https://dsas.vmwareidentity.com//SAAS/jersey/manager/api/scim/Users - Set the Content-Type to “application/json”
- Use the following as a sample:
{
  "schemas": [
    "urn:scim:schemas:core:1.0",
    "urn:scim:schemas:extension:workspace:tenant:sva:1.0",
    "urn:scim:schemas:extension:workspace:1.0",
    "urn:scim:schemas:extension:enterprise:1.0"
  ],
  "userName": "testing5@mydomain.com",
  "name": {
    "givenName": "first5",
    "familyName": "last5"
  },
  "emails": [
    {
      "value": "testing5@mydomain.com"
    }
  ],
  "password": "Password$!",
   "urn:scim:schemas:extension:workspace:1.0": {
        "internalUserType": "LOCAL",
        "domain": "mydomain.com"
      }


}
Creating Users in an Other Directory
The steps to create a user in an other directory is almost identical to the local directory except that we need to know the “domain” associated with the directory and we need an ExternalID. The External ID should be a unique value. It is recommended that you use a GUID for this value. See Online UUID Generator Tool as a example of a proper GUID. Note: In Postman you can use the function ” {{$guid}}” to automatically generate one.
- Open a new Tab in Postman
- Add the Authorization Header as per the previous section.
- For the HTTP Method, select “POST”
- For the URL, enter: https://TENANTURL/SAAS/jersey/manager/api/scim/Users
Replace the Tenant URL with your URL
Replace the ID with the ID from the step 4 in this section.
ie. https://dsas.vmwareidentity.com//SAAS/jersey/manager/api/scim/Users - Set the Content-Type to “application/json”
- Use the following as a sample and don’t forget to create a Unique External ID.
{
  "schemas": [
    "urn:scim:schemas:core:1.0",
    "urn:scim:schemas:extension:workspace:tenant:sva:1.0",
    "urn:scim:schemas:extension:workspace:1.0",
    "urn:scim:schemas:extension:enterprise:1.0"
  ],
  "externalId": "{{$guid}}",
  "userName": "testing6@mydomain.com",
  "name": {
    "givenName": "test6",
    "familyName": "last6"
  },
  "emails": [
    {
      "value": "testing6@mydomain.com"
    }
  ],
  "urn:scim:schemas:extension:workspace:1.0": {
        "internalUserType": "PROVISIONED",
        "domain": "1dsavm.com",
        "userPrincipalName": "testing6@mydomain.com"
      }
}
Creating an Other Directory
When you configure UEM to integrate with Identity Manager an “Other” Directory should be automatically created. If in the case it is not created, you can create one via the API as well.
- Open a new Tab in Postman
- Add the Authorization Header as per the previous section.
- For the HTTP Method, select “POST”
- For the URL, enter: https://TENANTURL/SAAS/jersey/manager/api/connectormanagement/directoryconfigs
Replace the Tenant URL with your URL
ie. https://dsas.vmwareidentity.com/SAAS/jersey/manager/api/connectormanagement/directoryconfigs - Set the Content-Type to “application/vnd.vmware.horizon.manager.connector.management.directory.other+json“
- Use the following as a sample
{
"type":"OTHER_DIRECTORY",
"domains":["SteveTestDomain2"],
"name":"SteveTest2"
}
Create SCIM Groups
- Open a new Tab in Postman
- Add the Authorization Header as per the previous section.
- For the HTTP Method, select “POST”
- For the URL, enter: https://TENANTURL/SAAS/jersey/manager/api/scim/Groups
Replace the Tenant URL with your URL
ie. https://dsas.vmwareidentity.com//SAAS/jersey/manager/api/scim/Groups - Set the Content-Type to “application/json”
- Use the following as a sample:
{
  "schemas": [
    "urn:scim:schemas:core:1.0",
    "urn:scim:schemas:extension:workspace:1.0"
  ],
  "displayName": "pmGroup2",
   "urn:scim:schemas:extension:workspace:1.0": {
        "domain": "mydomain.com"
      }
}
Adding SCIM Users to SCIM Groups
In order to add a SCIM user to a SCIM group, we need to know the “id” for both the user and group.
Get ID For User
- Open a new Tab in Postman
- Add the Authorization Header as per the previous section.
- For the HTTP Method, select “GET”
- Enter the following for the URL: https://TENANTURL/SAAS/jersey/manager/api/scim/Users?filter=username%20eq%20%22MyUserID%22
Replace MyUserID with a username in your environment
ie. https://dsas.vmwareidentity.com/SAAS/jersey/manager/api/scim/Users?filter=username%20eq%20%22bbuser1%22 - This will return a complete result set of attributes for the particular user.
- Retrieve the ID for the User.

Get ID for Group
- Open a new Tab in Postman
- Add the Authorization Header as per the previous section.
- For the HTTP Method, select “GET”
- Enter the following for the URL: https://TENANTURL/SAAS/jersey/manager/api/scim/Groups?filter=displayName%20eq%20%22GroupName%22
Replace GroupName with a group in your environment
ie. https://dsas.vmwareidentity.com/SAAS/jersey/manager/api/scim/Groups?filter=displayName%20eq%20%22pmgroup2%22 - This will return a complete result set of attributes for the particular group.
- Retrieve the ID for the Group.

Add User to Group
- Open a new Tab in Postman
- Add the Authorization Header as per the previous section.
- For the HTTP Method, select “PATCH”
- Enter the following for the URL: https://TENANTURL/SAAS/jersey/manager/api/scim/Groups/IDforGroup
Replace IDforGroup with the Group ID in the previous section.
ie. https://dsas.vmwareidentity.com/SAAS/jersey/manager/api/scim/Groups/236dca5e-426a-4d00-b0ec-105aa8748f37 - Use the following as a sample – Use the ID for the user you retrieved in the previous section
{
    "schemas": [
        "urn:scim:schemas:core:1.0"
    ],
    "members": [
        {
            "value": "b4ec7855-e281-47bd-8307-26b9b68a2de8"
        }
    ]
}
Other Useful API Calls
Delete AirWatch Configuration from Workspace ONE Access
Note: This API call will delete the AirWatch Configuration from Workspace ONE Access. It will not delete any of the configuration from Workspace ONE UEM. If you delete this configuration, you will not be able to run the Wizards from UEM again. Please use with Caution.
- Open a new Tab in Postman
- Add the Authorization Header as per the previous section.
- For the HTTP Method, select “DELETE”
For the URL, enter: https://TENANTURL/SAAS/jersey/manager/api/tenants/tenant/airwatchoptin/config
Replace the Tenant URL with your URL - Set the Content-Type to “application/vnd.vmware.horizon.manager.tenants.tenant.airwatchoptin.config+json;charset=UTF-8”
- Click Send
- You should receive an HTTP 205 response
- Your Workspace ONE UEM Section should now be blank:
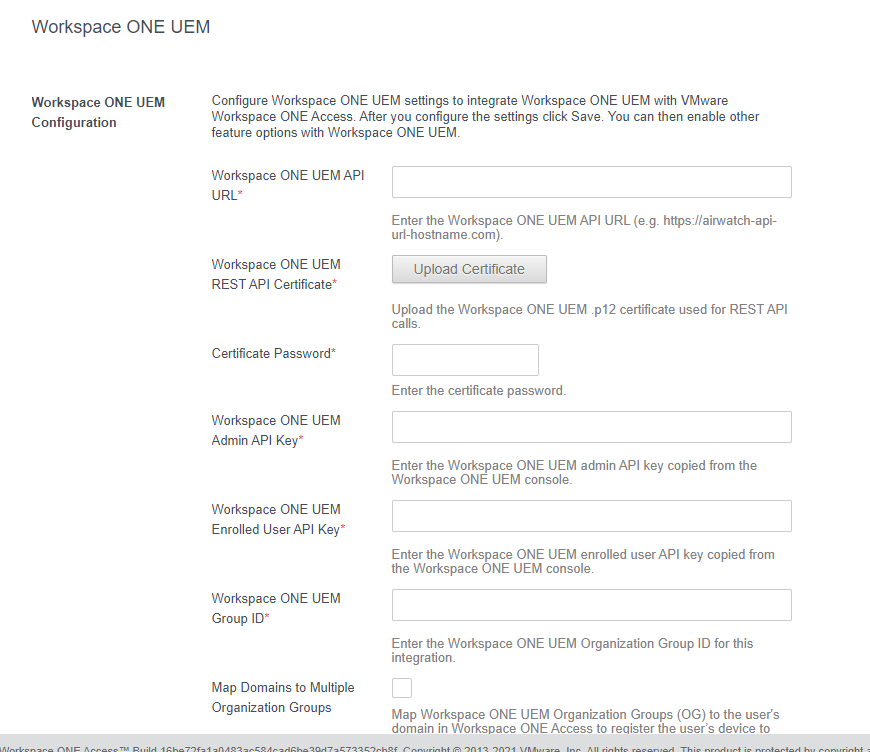
- Once you’ve updated your Workspace ONE UEM section with the new server details, on some occasions your Device Compliance Authentication Method might still be pointing to your old environment. In this case, toggle your Device Compliance Authentication Method (Enabled/Disabled) and Save each time.
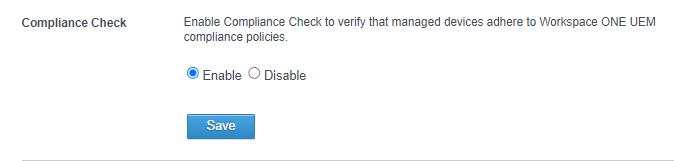
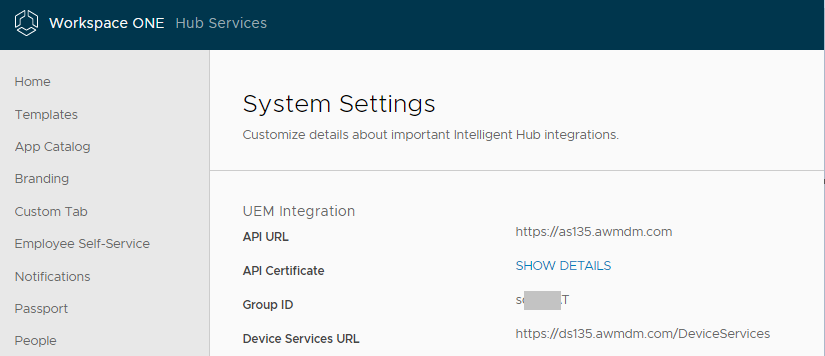
- Once you’ve updated your Workspace ONE UEM section with the new server details, verify your in your Hub Settings that you have the correct information
Troubleshooting
It would be impossible to discuss every combination of errors that can be returned using the API. Here are a few common ones:
- If you receive the error “User is not authorized to perform the task.”.
This error typically means that your Oauth Token has expired. Regenerate your OAuth Token. If you have used the browser cookies method to get your token, ensure that your HZN cookie is from the administrative interface. - When doing an update user, you receive the error “”???UNSUPPORTED_MEDIA_TYPE???””
This error means that you are sending a blank or incorrect Content-Type. Check to make sure the content-type is set to “application/json”

you have helped me today… thank you so much!
LikeLike
Thank you. Its very hard to keep this particular blog updated as the Postman app is constantly changing.
LikeLike
Thank you so much for this article!
Maybe this is a dumb question, but how would I Remove a user from a SCIM group?
LikeLike
If you add an “operation” on the PATCH command you can remove the user from the group. ie. “value”:”76c049fc-641c-42db-9a6c-9ff6db35cb9e”,”operation”:”delete”
LikeLike
I feel like I was answered by Gandalf himself – that was the magic answer I needed. Thanks again!
LikeLike
Hi, regarding the script for changing the user ID for a computer: AFAIK the API patch command only works on Macs. So is the script limited to Macs?
LikeLike